
MIM vs MBJ: Which Metal Manufacturing Technology Is Right For Your Project?
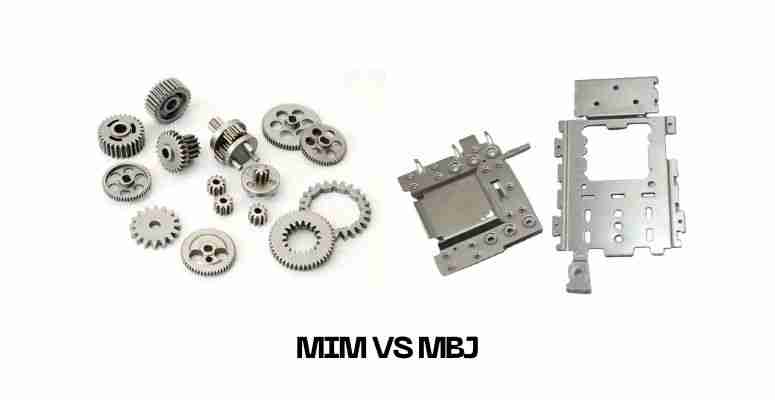
Metal Injection Molding (MIM) and Metal Binder Jetting (MBJ) are competing sinter-based technologies for manufacturing small metal parts. MIM requires tooling investment but achieves low per-part costs at high volumes with tight tolerances. MBJ eliminates tooling costs entirely and delivers parts in 1-2 weeks but maintains higher per-part cost across all volumes, making it suitable for lower volumes or geometrically complex components.
You're evaluating a complex metal component and facing a critical decision: commit to MIM tooling with uncertain demand, or start production immediately with MBJ at higher per-part cost? This choice determines your time-to-market, unit economics, and project success.
TL;DR: The 60-Second Decision Guide
Economic Break-Even Point:thousands to tens of thousands of units annual production volume
Choose MIM When:
- Annual volume is high enough to amortize tooling
- Design is finalized and stable
- Need ±0.3% tolerances or Ra <3.2 μm surface finish
- Can justify tooling investment
- Long-term production planned (3+ years)
- Target unit cost:low per-part cost at very high volume
Choose MBJ When:
- Annual volume is too low to justify tooling
- Need parts delivered in 1-2 weeks
- Design requires internal channels, lattices, or complex undercuts
- Design may evolve or need iterations
- Cannot commit to tooling costs upfront
- Cost reality:higher per-part cost (all volumes)
The Hybrid Strategy:Use MBJ for prototyping and market validation at low volumes, then transition to MIM for mass production once design is proven and volumes justify tooling.
💡Rule of Thumb:If uncertain about volumes or design stability, start with MBJ. The cost of wrong tooling often far exceeds the cost of higher per-part pricing during validation.
Quick Decision Framework
START HERE→ What's your annual production volume?
Low volume→ Does your design have complex internal features?
- YES →MBJ(only viable option)
- NO →MBJ(economics alone justify it)
Moderate volume (Evaluation Zone)→ Is your design finalized and locked?
- YES → Run detailed cost analysis (likelyMIM)
- NO →MBJ(avoid tooling risk)
High volume→ Is your design stable for 2+ years?
- YES →MIM(lowest long-term cost)
- NO →Hybrid Strategy(MBJ bridge → MIM production)
Video: Comprehensive overview of the metal binder jetting 3D printing process, from powder spreading to final sintering
The Fundamental Process Difference
Both MIM and MBJ end with sintering (thermal densification). The critical difference: how they create the initial "green part." This difference cascades into distinct capabilities, constraints, and economics.
MIM: Mold-Based Manufacturing
MIM mixes fine metal powder (60% by volume) with polymer binder, injects this feedstock into steel molds at high pressure, then removes the binder and sinters the part at near-melting temperatures.
Key Constraint—The Mold:
- Cost:thousands to tens of thousands of dollars depending on complexity
- Lead time:5-12 weeks to design and fabricate
- Design change penalty:thousands of dollars for modifications, and potentially a full tooling replacement for major changes
The mold is simultaneously MIM's greatest strength (enables exceptional repeatability and low per-part costs at scale) and primary limitation (requires upfront investment and design stability).
Process outcomes:
- Shrinkage:15-20% during sintering (compensated in mold design)
- Density:96-99% (100% with HIP treatment)
- Tolerances:±0.3%
- Surface finish:Ra 0.8–1.6 µm as-sintered (replicates polished mold surface)
- Cycle time:10-60 seconds per shot; 1-30 parts per cycle with multi-cavity molds
💡MIM Design Constraint:Parts must be ejectable from a two-piece mold. This eliminates complex internal channels, lattice structures, and severe undercuts. Wall thickness must be relatively uniform (±20% variation maximum) to prevent warping during sintering.
MBJ: Tool-Less Additive Manufacturing
MBJ spreads thin powder layers and uses inkjet printheads to selectively deposit liquid binder, building parts layer-by-layer. The powder bed provides natural support. Parts then undergo the same debinding and sintering as MIM.
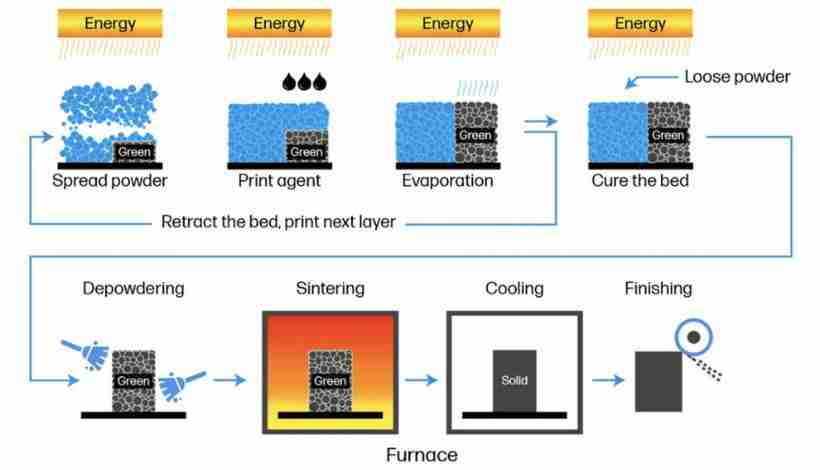
Metal binder jetting process: inkjet printheads selectively deposit binder onto metal powder layers to build complex 3D parts.
Key Advantage—Zero Tooling:
- Cost:no tooling investment
- Lead time:1-2 weeks from CAD to parts
- Design changes:Near-zero cost—just update the CAD file
Process outcomes:
- Shrinkage:~20% during sintering (harder to predict in complex geometries)
- Density:93-97% typical (some systems claim 98%+)
- Tolerances:±0.5% (often requires iteration to optimize compensation)
- Surface finish:Ra 3.2-6.3 μm (requires post-processing for smoother finish)
- Build speed:10-100× faster than laser-based metal AM due to parallel binder deposition
💡MBJ Design Freedom:The powder bed enables complex internal channels, lattice structures, interlocking parts, and consolidated assemblies impossible with molding. However, you must include escape holes (≥5mm diameter) for powder removal and design for sintering deformation.
Design Capabilities: What You Can Actually Make
MIM Constraints (Moldability Physics):
❌ Cannot produce:
- Complex internal channels not in line-of-sight
- Lattice structures for lightweighting
- Interlocking or assembled-in-place features
- Severe undercuts without expensive slide actions
✅ Ideal for:
- Uniform wall thickness designs (0.5-6mm)
- External features with simple internal cavities
- Parts requiring fine detail (features down to 0.1mm)
- High surface finish requirements
MBJ Capabilities (Layer-by-Layer Freedom):
✅ Can produce:
- Conformal cooling channels and complex fluidic paths
- Internal lattice structures (significant weight reduction possible)
- Consolidated assemblies (replace 5-10 components with one part)
- Topology-optimized designs with variable wall thickness
⚠️ Constraints:
- Minimum feature size: 2.0mm (vs. 0.1mm for MIM) due to green part fragility
- Horizontal spans >20mm may sag during sintering
- Requires escape holes for trapped powder removal
Design Capability Comparison
| Parameter | MIM | MBJ | Decision Impact |
|---|---|---|---|
| Tolerance | ±0.3% | ±0.5% | MIM for precision-critical parts |
| Min Wall | 0.1-0.5mm | 0.5-1.0mm | MIM for thin-wall capability |
| Wall Variation | Must be uniform | Variable acceptable | MBJ for topology optimization |
| Min Feature | ~0.1mm | ~2.0mm | MIM for fine detail |
| Part Size | 0.01-50g optimal | 0.1-200g optimal | MBJ for larger parts |
| Internal Channels | Line-of-sight only | Fully enclosed | MBJ advantage |
| Lattice Structures | Impossible | Key capability | MBJ exclusive |
| Surface Finish | Ra 0.8–1.6 µm | Ra 3.2-6.3 μm | MIM for aesthetics |
💡Decision Rule:If your design requires internal channels, lattices, or part consolidation, MBJ may be your only option regardless of volume. If your design is moldable, choose based on volume and economics.
Material Properties and Performance
Density and Mechanical Properties
| Property | MIM | MBJ |
|---|---|---|
| Density | 96-99% (100% with HIP) | 93-97% typical (98%+ on advanced systems) |
| Tensile strength | 95-100% of wrought | 90-97% of wrought |
| Residual porosity | <1% (small, closed pores) | 0.2-2.0% |
| Fatigue performance | Excellent (minimal stress concentration) | Good (porosity reduces high-cycle fatigue life 5-15%) |
For static load applications, both technologies are adequate. For dynamic/fatigue or impact applications, MIM's higher density provides measurably longer service life.
17-4PH Stainless Steel Benchmark
| Property | MIM (H900) | MBJ (H900) | MPIF Std 35 |
|---|---|---|---|
| Tensile Strength | 1,185-1,238 MPa | 1,230-1,276 MPa | >1,070 MPa |
| Yield Strength | 1,090-1,124 MPa | 1,072-1,158 MPa | >970 MPa |
| Elongation | 6-14% | 7-13% | >4% |
| Hardness | 38-41 HRC | 38-41.5 HRC | 33 HRC typical |
Both technologies meet or exceed MPIF Standard 35 for 17-4PH. Performance differences are minimal with high-quality powders and optimized sintering. Process choice should be driven by volume, complexity, and economics—not material capability concerns.
Surface Finish and Finishing Costs
MIM delivers Ra 0.8–1.6 µm as-sintered, often acceptable without finishing. MBJ delivers Ra 3.2-6.3 μm as-sintered and usually requires tumbling, polishing, or machining.
⚠️Cost Trap:Factor in finishing costs when comparing economics. A raw MBJ part plus secondary finishing can end up materially more expensive than the as-printed piece price if a smooth surface is required.
Material Availability
MIM offers an extensive, mature library: stainless steels, tool steels, soft magnetics, copper, titanium, tungsten, and specialty alloys. MBJ's portfolio is growing but currently most mature with 316L and 17-4PH stainless steel.
For exotic alloys or soft magnetic materials, MIM offers broader selection. For stainless steel applications, both technologies are well-established.
Economic Analysis: The True Cost Structure
Capital Investment
| Cost Element | MIM | MBJ |
|---|---|---|
| Tooling | Thousands to tens of thousands of dollars | None |
| Lead time to first parts | 5-12 weeks | 1-2 weeks |
| Design change penalty | Often thousands of dollars; major changes may require new tooling | Near-zero (update CAD file) |
💡Strategic Insight:The cost of MIM tooling can equal the cost of many MBJ parts. You can validate market demand with thousands of real parts before committing to tooling.
Per-Part Economics Across Volume
MIM (Economy of Scale):
- 5,000 units: moderate per-part cost
- 25,000 units: lower per-part cost
- 50,000 units: low per-part cost
- 100,000+ units: very low per-part cost
MBJ (Flat Economics):moderate to high per-part cost at all volumes, driven by machine time and material per part with limited scale economies.
Break-Even Calculation
Break-even depends on the actual MBJ per-part cost, MIM per-part cost, and tooling investment. Break-even typically occurs atthousands to tens of thousands of units annual productionfor medium-complexity parts. Simple parts break even lower; complex parts higher.
Total Cost Comparison
| Volume | MIM Total Cost Trend | MBJ Total Cost Trend | Typical Winner |
|---|---|---|---|
| 1,000 units | Tooling dominates | Low total outlay | MBJ |
| 5,000 units | Still tooling-heavy | Moderate total outlay | MBJ |
| 10,000 units | Approaching parity | Approaching parity | Break-even zone |
| 25,000 units | Tooling amortized | Total outlay growing | MIM |
| 50,000 units | Low per-part cost | High cumulative cost | MIM |
| 100,000 units | Very low per-part cost | Very high cumulative cost | MIM |
*MIM includes upfront tooling plus per-part costs. **MBJ includes per-part costs only, zero tooling.
Lead Time Value
MIM requires 8-16 weeks to first production parts; MBJ delivers in 1-2 weeks. This 6-14 week advantage can be decisive for time-sensitive applications—earlier market entry often offsets the higher per-part cost difference.
Industrial Applications
MIM: High-Volume Manufacturing
Automotive (100K-1M+ units/year):Variable geometry turbocharger components, transmission parts, fuel injection components, sensor housings. MIM delivers zero-defect quality with statistical process control (Cpk >1.67) at low per-part cost.
Medical & Dental:Surgical instruments, orthodontic brackets, dental implants, surgical electrodes. Biocompatible materials, excellent surface finish for sterilization, and documented process control for regulated production.
Consumer Electronics (50K-500K units/year):Smartphone components, laptop hinges, smartwatch cases, wearable structures. Aesthetic quality (Ra <2 μm) at high-volume cost targets.
MBJ: Agility and Complexity
Rapid Prototyping & Development:Functional prototypes, design iterations, regulatory testing samples, market validation—zero tooling eliminates financial risk at 50-500 units.
Complex Geometry:Aerospace brackets with lattices for weight reduction, heat exchangers with conformal cooling, custom tooling with internal features. These geometries are impossible to mold.
Low-Volume & Customized:Patient-specific medical implants, custom industrial tooling, limited-edition products, aftermarket parts—volumes below 5,000 units make tooling unjustifiable.
Real Failure Cases
MIM Mistake—Premature Tooling:A startup invested in MIM tooling for projected high annual volume. Actual demand was much lower, so the effective per-part cost remained high. MBJ would have been the better initial choice until demand was proven.
MBJ Mistake—Volume Blindness:A company continued producing high annual volume via MBJ at moderate per-part cost. A MIM alternative with upfront tooling and much lower per-part cost would likely have delivered substantial annual savings. When volume exceeds roughly 20,000 units annually and design is stable, transitioning to MIM should be evaluated.
The Hybrid Strategy
The most effective approach leverages both technologies sequentially:
Phase 1: Development & Validation (MBJ) — Months 1-12
- Volume: 50-2,000 units
- Objective: Prove design and validate market demand
- Investment: modest prototyping and initial-sales spend
- Risk: Minimal—only pay for parts produced
Phase 2: Bridge Production (MBJ) — Months 12-24
- Volume: 2,000-10,000 units
- Objective: Scale market presence while finalizing design
- Investment: revenue-generating production volume
- Value: Proves consistent demand before tooling commitment
Phase 3: Mass Production (MIM) — Months 24-36+
- Volume: 20,000+ units annually
- Objective: Optimize unit economics
- Investment: MIM tooling (justified by proven demand)
- Savings: significant annual savings at 25,000 units/year
📊Example:A surgical instrument company used this hybrid strategy:
- Years 1-2: MBJ for prototyping and market validation
- Year 3+: Transitioned to MIM at higher annual volume
- Result: substantial long-term savings versus staying with MBJ-only production
Committing to MIM tooling in Year 1 before market validation would have been premature.
Complete Decision Framework
Step 1: Annual Production Volume
- Low volume → MBJ (tooling cannot be justified)
- Medium volume → Detailed analysis required
- Moderate-to-high volume → MIM if design is stable
- High volume → MIM financially imperative (if design locked)
💡 Critical question before proceeding: Are you confident your design won't change? If no, start with MBJ regardless of volume.
Step 2: Geometric Complexity
MIM deal-breakers (must use MBJ):
- Internal channels not in line-of-sight
- Lattice structures for lightweighting
- Interlocking features
- Part consolidation replacing 5+ components
If your part has these features, volume is irrelevant—MBJ is the only option.
Step 3: Performance Requirements
- Tight tolerances (±0.3%) → MIM advantage
- Superior surface finish (Ra <3.2 μm) → MIM (or factor finishing cost into MBJ cost)
- High-cycle fatigue or impact critical → MIM (96-99% density vs. 93-97%)
- Moderate tolerances (±0.5%) acceptable → Either technology viable
Step 4: Timeline & Risk
- Need parts in <4 weeks → MBJ only option
- Design may evolve → MBJ reduces risk (no change penalty vs. tooling modification cost)
- Design locked, long-term production → MIM optimal
- Cannot absorb tooling sunk-cost risk → MBJ (pay-as-you-go)
Decision Tree
START → Annual Volume?< 10K units → MBJ (Economics + flexibility)10K-20K units → Design locked? YES → Cost analysis (likely MIM) NO → MBJ (avoid tooling risk)> 20K units → Complex geometry required? YES → MBJ (only option) NO → Design stable 2+ years? YES → MIM (lowest cost) NO → Hybrid (MBJ → MIM)
Frequently Asked Questions
Q: What is the main difference between MIM and MBJ?
MIM uses injection molding with tooling investment but achieves low per-part costs at high volumes with tight tolerances (±0.3%). MBJ uses tool-less 3D printing, enabling 1-2 week delivery and design freedom but maintains higher per-part cost with wider tolerances (±0.5%). Both end with sintering to achieve final metal properties.
Q: At what volume does MIM become more economical than MBJ?
Break-even typically occurs at thousands to tens of thousands of units annual production for medium-complexity parts. Below this, MBJ's zero tooling cost makes it cheaper. Above this, MIM's low per-part cost quickly overcomes tooling investment. At 50,000 units/year, MIM generally delivers substantial annual savings versus continued MBJ production.
Q: Can MBJ achieve the same mechanical strength as MIM?
For most applications, yes. Both achieve 95%+ of wrought material strength and meet MPIF Standard 35. MIM reaches 96-99% density; MBJ achieves 93-97%. For static loads, performance is functionally equivalent. For high-cycle fatigue or impact applications, MIM's higher density (1-3% difference) provides measurably longer service life.
Q: What geometries are impossible with MIM?
MIM cannot produce: complex internal channels not in line-of-sight, lattice structures, interlocking parts, severe undercuts without expensive slide actions, or topology-optimized designs with variable wall thickness. These require MBJ's additive approach. If your design has these features, volume is irrelevant—only MBJ is viable.
Q: Can I transition from MBJ to MIM as volume grows?
Yes—this is the recommended hybrid strategy. Use MBJ for prototyping and market validation (0-10,000 units) to prove design and demand without tooling risk. Transition to MIM when volumes exceed 15,000-20,000 units annually and design is stable. A medical device company reported substantial long-term savings using this approach.
Q: How do I choose definitively between MIM and MBJ?
Four-factor framework:
- Volume:<10K units → MBJ; >20K units → MIM
- Complexity:Requires internal channels/lattices → MBJ only option
- Tolerances:Need ±0.3% → MIM; ±0.5% acceptable → Either
- Timeline/Risk:Need <4 weeks or design may change → MBJ
If uncertain, start with MBJ for market validation. The cost of wrong tooling sunk in unused tooling far exceeds temporarily higher per-part costs during validation.
Conclusion
Choose MIM when:production volumes exceed 20,000 units annually with stable demand, design is finalized, tight tolerances (±0.3%) or superior surface finish are required, and long-term production justifies the upfront investment. At 50,000 units/year, MIM generally delivers substantial annual savings versus MBJ, with tooling investment typically recovering within months.
Choose MBJ when:volumes are below 10,000 units annually, design requires internal channels or lattices that cannot be molded, rapid delivery (1-2 weeks) is needed, design flexibility is required, or upfront capital cannot be committed.
Use the hybrid strategy when:developing new products with uncertain demand, volumes will grow from under 5,000 to over 20,000 over 2-3 years, or time-to-market is critical but long-term cost optimization matters.
The two most costly mistakes: premature MIM tooling (wasted if design changes or volume doesn't materialize), and staying with MBJ past the break-even point (significant avoidable per-part costs annually above 20,000 units).
Precision Metal Parts from Emitech
Nanjing Emitech delivers MIM, CNC machining, and custom metal parts. MIM services · Request a quote
Last updated: 2026-06-24